
Hello everyone and happy (almost) V-Day!
I wanted to bring some Valentine vibe into my home this season and what better way but to start at the front door?
This project was truly a labor of love. It took about two days to complete but it was totally worth it. Now, it can be done in one day if you are fully dedicated and committed to the project, but house remodeling got in the way so for me took much longer than anticipated. If I had to do it again, I would definitely change a few things to speed up the process, making the cuts a little bigger would definitely be one of them.

I payed a visit to Michael’s the other day mostly because they had a huge sale going on and, on top of everything else, I picked up items for this project as well. Since I knew that I was going to use my Cricut machine(s) for this, I chose 12×12 paper size, but you can actually go with any paper size and/or color just make sure that the paper weight is neither too light nor too heavy. I picked a 65 lbs card stock and this weight card stock is truly the best for paper project such as this one. It is flexible yet sturdy enough to hold the shape. Aside from the paper I picked up two different style of ribbon. I was lucky enough to have find these two spools of ribbon that were 80% off and I picked a #16 styrofoam wreath by CraftFoam.
Aside from these supplies you will definitely need a glue gun; if you do not have one, you can find them at Michael’s for a few bucks as well, they are fairly inexpensive.
I would like to mention that if you do not have a Cricut machine, you can definitely make this by just using a pair of scissors: simply draw a spiral line on your paper and cut it.
So, let’s begin!


I went to Cricut Design Space and I simply typed “roses” and this was the image that I picked (see pic. on the left). When you add it to your design space it will look like bunch of spirals. There are three different sizes in this image, but even if there was only one size, you can easily manipulate images in this program, all you need is one image :). Picking up sizes was a little trickier, and I had to experiment here a little bit and these are my sizes: L – 4.25″ x 3.77″; M – 3.45″ x 3″; S – 2.8″ x 2.5″. The picture on the right shows how many of the spirals I created, there is 48 spirals total and they all fit on 5 mats. Now, I have two Cricut machines and I repeated the cuts 4 times, which would approximately give you a total of 400 spirals. Yes, it can be overwhelming, that is why this project took almost two days to finish, and having Cricut machines truly helped and speeded up the process.


While my spirals were getting cut, I covered the wreath with a solid red ribbon so the white color of the styrofoam would not show when I glue my flowers on. This is optional and you can totally skip this step, I just thought that this will give it a more finished and polished look.


Next, it was time for folding the spirals.
I found the easiest and the fastest way to do this was with a paper quilling tool. These tools are super easy to come by and they are inexpensive. You can find them at your local craft store or on Amazon.
Another thing that I would like to mention that will definitely help you with the process is that to do one thing at a time. For example, twist your spirals first and then glue them together. That way you get in a rhythm and you move much faster. And that is exactly what I did here.

Once all my spirals were done, I then glued them together and created beautiful little roses.
One tip I would like to give you is if you are using a hot glue for your projects, invest in a set of silicone cards for your fingers. I used to get a lot burns on my fingers until I finally bought a set and they are a total game changer!


I have folded a full box of paper roses and it was time to attach them all to the base/wreath. I have to admit that I made a lot more roses than I needed, but it is aways better to make more. I would have hated it to go back and made more. I just find it to be a waste of time. Always make extra and you can always use your leftovers for future projects. That is my philosophy anyway…
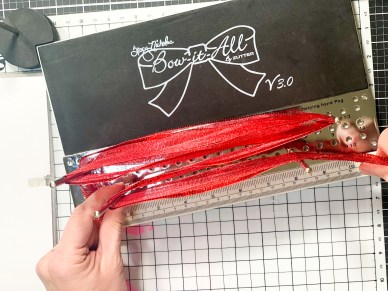
Next, I used my mash ribbon and I created a hanger and a bow for my wreath using “Bow It” by Zutter. This neat tool is great for making impressive bows of any size. You can even use two different ribbons for more interesting, multi color, bows.
And that was the end of the project. It did take a while to make it, as I said, but it was totally worth it!
Now, if you read this post all the way and you like what you see and what I made, please let me know in the comments. IFor those who live in the US or Canada, I am generously gifting three lucky winners with free cuts mailed to you for free! Just send an email to lanabylanadesign@gmail.com with “Valentine’s Spirals” in a subject box by the 23rd of January 2021. and send a brief message with your name and mailing address.
Thank you so much for visiting me here today and see you soon in the next post.


1 Comment