
Yahoo! And here we are with the last challenge! I am so beyond exited and I have to admit that I’ve come a long way! I am now closer than ever to becoming a certified Altenew educator and I simply cannot wait to see what they have for me next as my final exam! This is going to be fun!
Today, I am wrapping up with a letter Z – Zentangle for Cardmakers, a fun and totally different technique than anything I’ve done so far. This wonderful class is held by Amber Davis and it is absolutely fantastic! As any other class that Altenew gives, truly, whichever class you choose, trust me you will be extremely happy with the amount of inspiration and amazing tips and tricks these instructors give. Please click HERE for more information on Altenew classes.
Now, if you have never heard of a technique zantangle, you have to check it out! It is like doodling on steroids, l😁. There are some basic patterns and strokes that you can learn, but the bottom line is that there are no rules and just get in your zen and tangle!
And let us begin!
Card No1:

- Dainty Swiss Dots Stamp Set by Altenew
- Tall Alpha Die Set by Altenew
- Permanent Black Crisp Dye Ink by Altenew
- Fine Liner Pen Set by Altenew
- Mini Blossom Die Cutting Machine by Altenew
- Neenah Classic Crest Solar White 110 lbs Card Stock
- Black 110 lbs Card Stock
- Watercolor Paper
- MISTI Stamp Tool


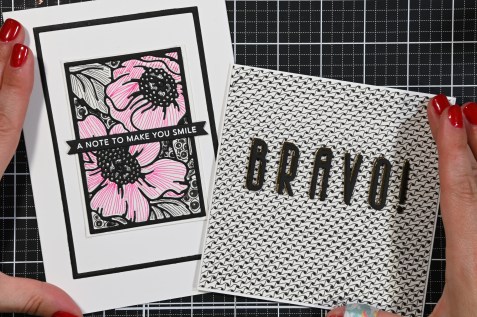
This card is going to someone extremely special to me – my niece, who has just finished her freshman year of high school! I picked 5 1/4 x 5 1/4 size card. Now, I know it is a little bit unconventional size, but I always found that 6×6 is too big and 5×5 too small, so, I found my perfect size and it works great with most background stamps. I first temporarily attached my card panel into my MISTI with Tombow Mono removable adhesive and I did the same thing to my stamp as well. The reason I do this is because I don’t like to remove big background stamps from their plastic backing, it is just a big mess, so putting removable adhesive on seems like a much better solution. Next, I simply inked up my stamp and stamped. For better results, I had to repeat this process a couple of times. I then took a super fine maker and started drawing – zentengling. I used Cadent pattern for this. Since this card is going to someone so special to me, I did not really care how much time I spend creating the background. But, one thing is certain, this is not a good pattern for mass producing. It took me 1h and 20 mins to complete this background. After this was done, the rest of it was easy. I die cut letters from s black and gold card stock and glued them together in a fashion that gold created a “shadow”, and this you can get this look by offsetting the layers a little bit, and added thin strips of foam tape for more dimension. To evenly position the letters on my card base I used a super cool laser tool, Laser Square and Mat by We R Memory Keepers. I first attached my panel to the base with removable adhesive and set my lasers. When attaching letters to your projects, one tip that I have to give you is always glue your first and the last letter of your word then use the center letter (this goes best for words with uneven number of letters) and work your way in. And that was done in no time. I then attached the panel to the base and the card was done!
Card No2:

Supplies used for card No2:
- Dog Rose Die Set (I used Panel A) by Altenew
- Fine Liner Pen Set by Altenew
- Neenah Classic Crest Solar White 110 lbs Cardstock
- 110 lbs Black Cardstock
- Watercolor Paper


This card was much easier and much faster to create. I started off by taking the Layer A die and dry embossed on watercolor paper. I used the same die and created a die cut using black card stock. Next it was time to zentangle! For flowers I used a Pilot Precise V5 pink pen and for the leaves and the background I used Altenew fine liners. I simply added lines and dots until my background was completed. I then glued the die cut from the black card stock and my design was done. I then die cut a simple frame from a black card stock and glued it on my card panel for more interest. Next, I glued the design and a sentiment strip and the card was done!
I cannot be more pleased with how these two cards turned out! I love this technique and I am so happy that I got to learn something new!
What an amazing gurney this has been and I am so grateful for Altenew for giving me this opportunity to show what I can do and to learn new and better my existing techniques. I highly recommend this program to anyone who loves cardmaking and wants to advance further.
I cannot wait to see what comes next and there is only one thing that is left to say:


1 Comment
Erum Tasneem
Fantabulous!!! Thank you for submitting your work to the AECP assignment gallery.